Archive | Health RSS feed for this section

Blood and Guts Stuffed Eggplant aka Imam Bayıldı

25 Oct

For most people, Halloween is synonymous with sugary indulgence. From handfuls of candy to haunted cakes, most people completely abandon their ideas about healthy eating. The very mention of vegetables on this sinfully sweet holiday is almost unheard of.

Spooky sweets shouldn’t get to have all the fun. With a plethora of shapes, textures, and colors, vegetables have wonderful potential to get a Halloween make over as well. This dish will make a wonderfully unexpected addition to any Halloween party spread. Plus the savory vegetables will help balance whatever sweets you are sure to consume as the evening progresses.

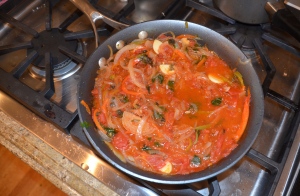
These eggplants have garlic to ward off any vampires (if that isn’t your intent for the evening, be sure to grab a stick of gum or some handful junior mints) while the onions make surprisingly convincing guts and the tomatoes give the appearance of blood.

This is a traditional Turkish dish that is perfect for any occasion, spooky intentions aside. It is perfectly salty and spicy and fresh all at once. Add some beans or beef crumbles into the filling and you have a complete meal.

I used fresh basil, thyme, and oregano in this dish because here in sunny California, my herb plants are still thriving, but feel free to substitute dried herbs or use different herbs altogether depending on what you have access to.

Blood and Guts Stuffed Eggplant 

Adapted from The Shiksa in the Kitchen

Serves 5-6

Ingredients:

  • 5-6 long, purple Chinese or Japanese eggplants (leave the ends in tact, don’t remove the stems)
  • 5-6 tablespoons olive oil, divided
  • 12 large, whole cloves of garlic, peeled and sliced latitudinally
  • 1 large onion sliced into very thin, half-moon style slices
  • 1 Bell Pepper
  • 1 spicy pepper (like Fresno Pepper or Anaheim Pepper)
  • 2 large tomatoes, finely diced
  • 1/2 cup basil leaves, julienned
  • 1/3 cup oregano leaves
  • 2 tablespoons thyme
  • 1/2 tsp kosher salt
  • 1/4 tsp ground black pepper
  • 1 large tomato, grated (optional)

Directions

  1. Preheat oven to 350 degrees Fahrenheit.
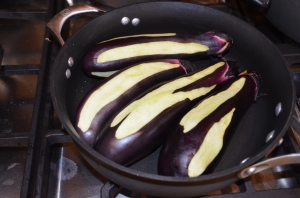
  2. Peel the eggplants in stripes, leaving about half of the purple skin on the eggplant. Generously salt the exterior of the eggplant to make it less bitter, and set aside for 45 min (don’t worry, you’ll wash it off later).
  3. Heat 3 tablespoons of olive oil on medium-high heat in a deep sauté pan. Add onions, garlic, and peppers. Stir frequently to prevent browning. Continue to sauté the vegetables until the onions become transparent. Stir frequently to prevent browning of onions and garlic.
  4. After onions are cooked, add the finely diced tomatoes, basil, oregano, thyme, salt, and pepper  into the sauté pan. Cook for another 5 minutes. Remove the vegetable mixture from heat and allow it to cool.
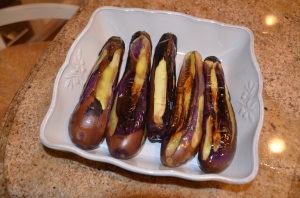
  5. Wash the eggplants, dry. Heat the remaining 2-3 tablespoons of olive oil in a pan (preferably nonstick, if not you may need to add more oil), and lightly brown the eggplants on each side for 1-2 minutes. Set the eggplants in a baking dish to cool.
  6. Cut an opening slit through the middle of each eggplant, being careful not to cut all the way through the eggplant. Use your fingers to expand the opening slightly, so that there is a little pocket in the middle of the eggplant.
  7. Stuff the pockets of the eggplants with the tomato-onion filling, equally divide the filling among the five eggplants. Season with a little more salt and pepper to taste.
  8. Top the eggplants with the grated tomato into the baking pan,if desired. Cover the pan with aluminum foil, then make several slits on the foil to let the steam escape while baking.
  9. Bake the eggplants for 45 minutes or until the eggplants are soft and fully cooked.

Fell free to dress up your eggplants with any spooky props from the party store. Fake bugs could be a fun added touch!


Savoring Summer With Peach Protein Muffins

4 Oct

With the arrival of October, Fall is really here. ALthough the blogosphere seems to be flooded with pumpkin and squash, I still want to hold onto my favorite orange produce for a little while longer.

I am relishing in the late-season varieties of peaches for as long as I possibly can. Nothing makes me relive wonderful summer memories like the sweet, juicy flavor of ripe peaches. Even as the temperature starts to cool down, I am determined to keep relishing in this simple pleasure.

That’s how these muffins came about. Packed with quinoa, chia seeds, flax seeds, coconut oil, and giant hunks of peach, these muffins are as good for you as they are tasty.  No, they aren’t light and fluffy, instead they are packed full of nutrients.

When microwaved for 30 seconds and served with a warm cup of tea or coffee, they make the perfect easy breakfast or afternoon snack.

Go ahead and make a second batch and stash them in the freezer so that you can continue to enjoy delicious summer produce even in the monotonous months when apples and oranges are the only fresh fruits to be found.

Peach Muffins with Chia and Hemp Seeds

Adapted from Get Natured

Yield: 12

Ingredients

  • 1 tbsp chia seeds
  • 1/4 cup warm water
  • 1 1/3 cup whole wheat pastry flour
  • 2/3 cup quinoa flour
  • 2 1/2 tsp baking powder
  • 1/4 tsp sea salt
  • 1 tsp cinnamon
  • 1/4 cup hemp seeds
  • 1/3 cup firmly packed brown sugar
  • 3 tablespoons coconut oil, melted
  • 1/2 tsp vanilla extract
  • 1/4 teaspoon almond extract (optional)
  • 3/4 cup skim milk, room temperature
  • 2 large peaches, finely chopped (leave the peel on for extra fiber)

Directions

  1. Preheat the oven to 350 degrees and line a muffin pan with silicone liners.
  2. Whisk together chia seeds and warm water in a small bowl and set aside.
  3. In a large bowl, sift together flours, baking powder, cinnamon, salt. Mix in the hemp seeds, then set aside.
  4. To the chia seed mixture, add milk, brown sugar, coconut oil, and extracts and combine well. Add this wet mixture to the dry ingredients and stir gently to combine-don’t overmix. Gently fold in the peaches.
  5. Spoon batter into muffin pan and smooth their tops with the back of a spoon. Bake the muffins for about 20 minutes.
  6. When a toothpick inserted into the middle of a muffin comes out clean and the muffins are golden brown, remove the muffins from oven and transfer them to cooling racks.

September Likes

27 Sep

10. Check out this wonderful list of 7 trips every woman should take in her lifetime over at The Frisky. As if anyone needed another reason to travel! While a trip may not be in your immediate plan, it’s still a good idea to keep this article in the back of your mind for the next time you’re on the hedge about leaving town.

9. I love this super-sweet heart braid featured on Cup of Jo. It is pretty enough to make any little girl jump with joy, and funky enough to dress up a basic sweater-and-jeans ensemble. No matter who wears this awesome hairstyle, it’s bound to get smiles all around.

8. Check out this incredible DIY pallet bed from Prudent Baby. I can’t believe some of the resourceful recycled DIYs that people come up with! It’s beautiful, it’s eco-friendly, and it costs practically nothing to make! Make it your own with whatever colors and prints inspire you. Besides, nothing will blow your friends’ minds like hearing that you made your own bed.

7. Check out these adorable collard-wrapped mini burritos over at The Daily Meal. They are packed with quinoa, beans, cheese, and veggies. The vibrant color and wonderful size make these a healthy and exciting appetizer for a party or special dish for a Meatless Monday family dinner. Get creative with the fillings and use whatever you like best. I guarantee it will end up costing far less than any commercial fast food burritos and it will be far more nutritious too!

6. For anyone looking to ward off a few pounds prior to donning revealing Halloween costumes or simply looking to avoid the dreaded Freshman 15, check out Slimkicker. The online database and iPhone ap turn health and fitness into a game. Upon accumulating enough points from completing your self-chosen challenges and chronicling your meals and exercise regime, you earn points to advance to the next level, at which time you treat yourself to whatever reward you chose. I love the idea of turning health into a game where you choose how hard you want to push yourself and you set your own goals.

5. All of the nail designs over at nail-fun.tumblr.com are pretty amazing, but these Cath-Kitson inspired floral nails may be my very favorite. The bright blue base and delicate rosettes are enough to make anyone smile when they look down at these nails. I doubt I could ever master the complicated designs on this site, but they certainly provide some great inspiration for the next trip to the nail salon.

4. I can’t get over how adorable this travel-inspired dessert buffet is over at Amy Atlas Events. The sweet map cut outs, vintage suitcases, fluffy meringue clouds, and pretty little hot air balloons make this such a creative update on the typical dessert bar. This seems like the perfect addition to an UP themed wedding to me!

3. I am so excited by this super-simple yoga mat cleaner DIY from Free People’s BLDG 25 Blog. It simply fills a spray bottle with 3 parts water with 1 part Witch Hazel and a few drops of essential oils with antibacterial properties such as tea tree, lemongrass, lavender, peppermint, or eucalyptus. I can’t wait to make it this weekend because my yoga mat doesn’t quite smell like roses…

2. This Ostrich Pillow on Kickstarter allows users to take a comfy power nap anywhere. I love that idea of the creators to design a product that “allow[s] you to create a little private space within a public one, to relax and unwind.” It allows you to bury your head and hands into the soft cushiony folds in order to catch some zzz’s on the go. The architecture firm who designed the product has met its goal with still 20 days to go.

1. This Decorated Cake Roll from Sugar For the Brain is absolutely awe-inspiring. Making any type of cake roll is pretty intimidating, but this beautifully printed cake seems terrifying to make. If you have the guts to try it, I can think of no better way to impress someone on their birthday. Sorry mom, I am not brave enough to make this for you next week…at least not yet. PS check out her Halloween Cake Roll on Best Friends for Frosting too!

Back to School Chocolate Strawberry & Zucchini Muffins

20 Aug

In June and even in July, summer seems like an endless stretch of time to cross items off your to do list, see people whom you don’t see often enough, and simply to relax. But as August starts to rear its ugly head, reality hits and you suddenly realize that the lofty plans you made for the summer will just have to wait some more. School and cold weather are just around the corner and no matter how tempting it may be to bury your books under your bed and forget about them, there’s no way to ignore rapidly approaching fall.

Rather than wallow in remorse over unaccomplished summer hopes and goals, focus on the exciting aspects of fall. This means that it’s almost close enough to Halloween that you can start planning your elaborate costume without sounding like a crazy person. This means it’s time to go shopping for new coats, boots, sweaters, or school supplies. This means that it’s gradually becoming time to resume your normal schedule of cozy nights indoors that your mind and body will appreciate even if you do not. And most importantly (for me at least) this means it’s starting to cool back down enough to turn back on the oven and stove to cook tasty, heart-warming meals and goodies.

Instead of resenting or resisting the passing of summer, set an example for those in your life who may not quite be ready for the change of the seasons by baking them tasty goodies to celebrate the best of summer produce in a form that is perfect for hectic fall mornings. By that I mean, bake them these Chocolate Strawberry & Zucchini Muffins, of course!


While these muffins are not exactly for picky eaters, they are delicious and nutritious, the perfect way to quell any chocolate cravings first thing in the morning while still getting in some veggies too. These muffins rely on shredded zucchini and applesauce to keep them nice and moist without the addition of any butter or oil.

Back to School Chocolate Strawberry & Zucchini Muffins

Yield: 18-20 muffins

Adapted from From the Little Yellow Kitchen

Ingredients:

  • 2 cups shredded zucchini, shredded
  • 1 cup white whole wheat flour
  • 1/2 cup quinoa flour
  • 1/3 cup sugar, rounded (or add 2/3 cup for sweeter, more traditional muffins)
  • 3/4 cup unsweetened cocoa powder
  • 1/2 teaspoon salt, divided
  • 1/2 teaspoon baking soda
  • 3/4 teaspoon baking powder
  • 1 teaspoon cinnamon
  • 2 eggs
  • 4 tablespoons greek yogurt
  • 1/2 cup unsweetened applesauce
  • 15 large strawberries (about 1 1/2 cups), chopped, plus 5 more, sliced for garnish
  • 1 cup semi-sweet chocolate chips (or you can chop up 1 bar of dark chocolate into tiny pieces-I had some left over from s’mores, so that’s what i did)

Directions:

  1. Preheat oven to 350 degrees. Line two muffins tins with silicone baking cups. Muffin batter sticks to paper liners too much, so invest in a few sets of silicone liners to avoid eating paper and cut down on waste.
  2. Coarsely grate the zucchini, then place in a colander and sprinkle it with a pinch of salt. Let it sit for about 10 minutes while combing the other ingredients to leach out the excess water from the zucchini.
  3. In a medium bowl, whisk together the flours, sugar, cocoa, salt, baking soda, baking powder and cinnamon.
  4. In another bowl, whisk the eggs. Then add the applesauce and yogurt, and stir well.
  5. Use paper towels to gently press the zucchini in the colander so that it releases any remaining excess liquid. Add the zucchini to the wet mixture and stir.
  6. Use your hands to form a well in the center of the dry mixture, then pour the wet mixture into the well. Stir until just combined. Fold in the strawberries and chocolate chips.
  7. Fill each baking cup about 3/4 full, then gently press a strawberry slice into the top of each muffin.
  8. Bake for 20-22 minutes, or until a toothpick inserted in the middle comes out clean.
  9. Allow the muffins to cool on cooling racks, then keep them refrigerated for up to 4 days or freeze them for a quick and easy breakfast or afternoon snack.


Mini Cherry Tomato Clafoutis

9 Jul

When it comes to cooking for just myself, I’m lazy. I call this a confession, but I’m guessing that most of you can relate. Whether it’s grabbing a quick weeknight nibble in between homework and studying, or trying to shove something in my mouth before going out with friends, food ceases to be my top priority.

That’s why when I’m in a rush, eggs become my go-to meal. I simply heat up some frozen veggies in a pan with a bit of olive oil, then add the eggs and scramble them quickly, then top it off with a bit of tomato sauce and freshly ground pepper. Voila! Healthy and tasty dinner ready in under 10 minute.

The eggs are wonderful when feeding just me, but sometimes I need something a bit more presentable that I can feel good about serving to friends or family, but still don’t want to spend a long time slaving away in the kitchen. These Mini Cherry Tomato Clafoutis proved to be the perfect solution. They take less than 10 minutes of active prep (plus 32 minutes in the oven) and come out looking pretty impressive if I do say so myself.

Fresh out of the oven, they are light and airy souffle-like creations that make you look like a master chef, no one else needs to know how easy they are to make. Within a few minutes, however they fall and become a bit denser, taking on an almost pancake-like consistency.

These are a perfect appetizer and they taste just as good microwaved for breakfast the next morning. The tartness of the tomatoes adds a delicious contrast to the comforting eggy taste of the Clafoutis itself. Make them in the next few months to take full advantage of summer’s most flavorful tomatoes.

Mini Cherry Tomato Clafoutis

Adapted from Vegetarian Times Farmers’ Market Cookbook

Serves: 12

Ingredients: 

  • 3 large eggs
  • ⅓ cup flour
  • 1 ½ cups skim milk
  • 3 tablespoons nonfat greek yogurt
  • 2 tablespoons fresh thyme leaves
  • ½ teaspoon salt
  • ¼ teaspoon ground black pepper
  • 1 pint grape or cherry tomatoes, halved (2 cups)
  • 3 tablespoons finely grated Parmesan cheese
  1. Preheat oven to 375°F and coat a 12-cup muffin pan with cooking spray.
  2. Whisk the eggs in bowl, then gradually whisk in flour. It may be slightly lumpy, but try to get it as smooth as possible.
  3. Stir in milk, yogurt, thyme, salt, and pepper.
  4. Divide the batter in two, then distribute 1/2 of the batter among the 12 muffin cups. Bake 10 minutes.
  5. Place 3-4 tomato halves in each muffin cup, round-side up. Pour remaining batter over the top and sprinkle with cheese. Bake 22 minutes more, or until tip of knife inserted in center comes out clean. Cool 1 minute, then unmold with knife or thin spatula. Serve warm.