Tag Archives: vegetables

Blood and Guts Stuffed Eggplant aka Imam Bayıldı

25 Oct

For most people, Halloween is synonymous with sugary indulgence. From handfuls of candy to haunted cakes, most people completely abandon their ideas about healthy eating. The very mention of vegetables on this sinfully sweet holiday is almost unheard of.

Spooky sweets shouldn’t get to have all the fun. With a plethora of shapes, textures, and colors, vegetables have wonderful potential to get a Halloween make over as well. This dish will make a wonderfully unexpected addition to any Halloween party spread. Plus the savory vegetables will help balance whatever sweets you are sure to consume as the evening progresses.

These eggplants have garlic to ward off any vampires (if that isn’t your intent for the evening, be sure to grab a stick of gum or some handful junior mints) while the onions make surprisingly convincing guts and the tomatoes give the appearance of blood.

This is a traditional Turkish dish that is perfect for any occasion, spooky intentions aside. It is perfectly salty and spicy and fresh all at once. Add some beans or beef crumbles into the filling and you have a complete meal.

I used fresh basil, thyme, and oregano in this dish because here in sunny California, my herb plants are still thriving, but feel free to substitute dried herbs or use different herbs altogether depending on what you have access to.

Blood and Guts Stuffed Eggplant 

Adapted from The Shiksa in the Kitchen

Serves 5-6

Ingredients:

  • 5-6 long, purple Chinese or Japanese eggplants (leave the ends in tact, don’t remove the stems)
  • 5-6 tablespoons olive oil, divided
  • 12 large, whole cloves of garlic, peeled and sliced latitudinally
  • 1 large onion sliced into very thin, half-moon style slices
  • 1 Bell Pepper
  • 1 spicy pepper (like Fresno Pepper or Anaheim Pepper)
  • 2 large tomatoes, finely diced
  • 1/2 cup basil leaves, julienned
  • 1/3 cup oregano leaves
  • 2 tablespoons thyme
  • 1/2 tsp kosher salt
  • 1/4 tsp ground black pepper
  • 1 large tomato, grated (optional)

Directions

  1. Preheat oven to 350 degrees Fahrenheit.
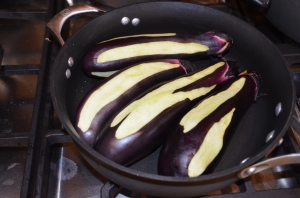
  2. Peel the eggplants in stripes, leaving about half of the purple skin on the eggplant. Generously salt the exterior of the eggplant to make it less bitter, and set aside for 45 min (don’t worry, you’ll wash it off later).
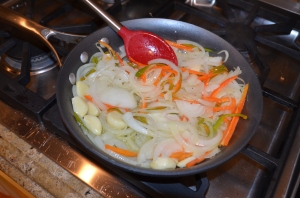
  3. Heat 3 tablespoons of olive oil on medium-high heat in a deep sauté pan. Add onions, garlic, and peppers. Stir frequently to prevent browning. Continue to sauté the vegetables until the onions become transparent. Stir frequently to prevent browning of onions and garlic.
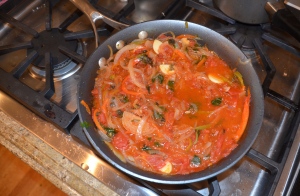
  4. After onions are cooked, add the finely diced tomatoes, basil, oregano, thyme, salt, and pepper  into the sauté pan. Cook for another 5 minutes. Remove the vegetable mixture from heat and allow it to cool.
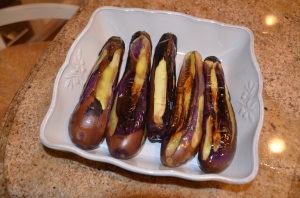
  5. Wash the eggplants, dry. Heat the remaining 2-3 tablespoons of olive oil in a pan (preferably nonstick, if not you may need to add more oil), and lightly brown the eggplants on each side for 1-2 minutes. Set the eggplants in a baking dish to cool.
  6. Cut an opening slit through the middle of each eggplant, being careful not to cut all the way through the eggplant. Use your fingers to expand the opening slightly, so that there is a little pocket in the middle of the eggplant.
  7. Stuff the pockets of the eggplants with the tomato-onion filling, equally divide the filling among the five eggplants. Season with a little more salt and pepper to taste.
  8. Top the eggplants with the grated tomato into the baking pan,if desired. Cover the pan with aluminum foil, then make several slits on the foil to let the steam escape while baking.
  9. Bake the eggplants for 45 minutes or until the eggplants are soft and fully cooked.

Fell free to dress up your eggplants with any spooky props from the party store. Fake bugs could be a fun added touch!


Back to School Chocolate Strawberry & Zucchini Muffins

20 Aug

In June and even in July, summer seems like an endless stretch of time to cross items off your to do list, see people whom you don’t see often enough, and simply to relax. But as August starts to rear its ugly head, reality hits and you suddenly realize that the lofty plans you made for the summer will just have to wait some more. School and cold weather are just around the corner and no matter how tempting it may be to bury your books under your bed and forget about them, there’s no way to ignore rapidly approaching fall.

Rather than wallow in remorse over unaccomplished summer hopes and goals, focus on the exciting aspects of fall. This means that it’s almost close enough to Halloween that you can start planning your elaborate costume without sounding like a crazy person. This means it’s time to go shopping for new coats, boots, sweaters, or school supplies. This means that it’s gradually becoming time to resume your normal schedule of cozy nights indoors that your mind and body will appreciate even if you do not. And most importantly (for me at least) this means it’s starting to cool back down enough to turn back on the oven and stove to cook tasty, heart-warming meals and goodies.

Instead of resenting or resisting the passing of summer, set an example for those in your life who may not quite be ready for the change of the seasons by baking them tasty goodies to celebrate the best of summer produce in a form that is perfect for hectic fall mornings. By that I mean, bake them these Chocolate Strawberry & Zucchini Muffins, of course!


While these muffins are not exactly for picky eaters, they are delicious and nutritious, the perfect way to quell any chocolate cravings first thing in the morning while still getting in some veggies too. These muffins rely on shredded zucchini and applesauce to keep them nice and moist without the addition of any butter or oil.

Back to School Chocolate Strawberry & Zucchini Muffins

Yield: 18-20 muffins

Adapted from From the Little Yellow Kitchen

Ingredients:

  • 2 cups shredded zucchini, shredded
  • 1 cup white whole wheat flour
  • 1/2 cup quinoa flour
  • 1/3 cup sugar, rounded (or add 2/3 cup for sweeter, more traditional muffins)
  • 3/4 cup unsweetened cocoa powder
  • 1/2 teaspoon salt, divided
  • 1/2 teaspoon baking soda
  • 3/4 teaspoon baking powder
  • 1 teaspoon cinnamon
  • 2 eggs
  • 4 tablespoons greek yogurt
  • 1/2 cup unsweetened applesauce
  • 15 large strawberries (about 1 1/2 cups), chopped, plus 5 more, sliced for garnish
  • 1 cup semi-sweet chocolate chips (or you can chop up 1 bar of dark chocolate into tiny pieces-I had some left over from s’mores, so that’s what i did)

Directions:

  1. Preheat oven to 350 degrees. Line two muffins tins with silicone baking cups. Muffin batter sticks to paper liners too much, so invest in a few sets of silicone liners to avoid eating paper and cut down on waste.
  2. Coarsely grate the zucchini, then place in a colander and sprinkle it with a pinch of salt. Let it sit for about 10 minutes while combing the other ingredients to leach out the excess water from the zucchini.
  3. In a medium bowl, whisk together the flours, sugar, cocoa, salt, baking soda, baking powder and cinnamon.
  4. In another bowl, whisk the eggs. Then add the applesauce and yogurt, and stir well.
  5. Use paper towels to gently press the zucchini in the colander so that it releases any remaining excess liquid. Add the zucchini to the wet mixture and stir.
  6. Use your hands to form a well in the center of the dry mixture, then pour the wet mixture into the well. Stir until just combined. Fold in the strawberries and chocolate chips.
  7. Fill each baking cup about 3/4 full, then gently press a strawberry slice into the top of each muffin.
  8. Bake for 20-22 minutes, or until a toothpick inserted in the middle comes out clean.
  9. Allow the muffins to cool on cooling racks, then keep them refrigerated for up to 4 days or freeze them for a quick and easy breakfast or afternoon snack.


Mini Cherry Tomato Clafoutis

9 Jul

When it comes to cooking for just myself, I’m lazy. I call this a confession, but I’m guessing that most of you can relate. Whether it’s grabbing a quick weeknight nibble in between homework and studying, or trying to shove something in my mouth before going out with friends, food ceases to be my top priority.

That’s why when I’m in a rush, eggs become my go-to meal. I simply heat up some frozen veggies in a pan with a bit of olive oil, then add the eggs and scramble them quickly, then top it off with a bit of tomato sauce and freshly ground pepper. Voila! Healthy and tasty dinner ready in under 10 minute.

The eggs are wonderful when feeding just me, but sometimes I need something a bit more presentable that I can feel good about serving to friends or family, but still don’t want to spend a long time slaving away in the kitchen. These Mini Cherry Tomato Clafoutis proved to be the perfect solution. They take less than 10 minutes of active prep (plus 32 minutes in the oven) and come out looking pretty impressive if I do say so myself.

Fresh out of the oven, they are light and airy souffle-like creations that make you look like a master chef, no one else needs to know how easy they are to make. Within a few minutes, however they fall and become a bit denser, taking on an almost pancake-like consistency.

These are a perfect appetizer and they taste just as good microwaved for breakfast the next morning. The tartness of the tomatoes adds a delicious contrast to the comforting eggy taste of the Clafoutis itself. Make them in the next few months to take full advantage of summer’s most flavorful tomatoes.

Mini Cherry Tomato Clafoutis

Adapted from Vegetarian Times Farmers’ Market Cookbook

Serves: 12

Ingredients: 

  • 3 large eggs
  • ⅓ cup flour
  • 1 ½ cups skim milk
  • 3 tablespoons nonfat greek yogurt
  • 2 tablespoons fresh thyme leaves
  • ½ teaspoon salt
  • ¼ teaspoon ground black pepper
  • 1 pint grape or cherry tomatoes, halved (2 cups)
  • 3 tablespoons finely grated Parmesan cheese
  1. Preheat oven to 375°F and coat a 12-cup muffin pan with cooking spray.
  2. Whisk the eggs in bowl, then gradually whisk in flour. It may be slightly lumpy, but try to get it as smooth as possible.
  3. Stir in milk, yogurt, thyme, salt, and pepper.
  4. Divide the batter in two, then distribute 1/2 of the batter among the 12 muffin cups. Bake 10 minutes.
  5. Place 3-4 tomato halves in each muffin cup, round-side up. Pour remaining batter over the top and sprinkle with cheese. Bake 22 minutes more, or until tip of knife inserted in center comes out clean. Cool 1 minute, then unmold with knife or thin spatula. Serve warm.

Fresh Corn Grilled Salad

19 Jun

This recipe is for…wait for it…a salad! I’ve never posted a salad recipe on my blog before because I feel like it’s cheating. When I make a salad, normally I just chop up whatever vegetables we have lying around and top it with some salsa or lemon juice with salt and pepper, but this salad is different. This salad is special. This salad is an adaptation of my very favorite salad, the Fresh Corn Grilled Salad.

Whenever I go to Fresh Corn Grill in Westwood I get this salad because even though there are half a dozen other things on the menu that sound good, nothing can be as delicious as this salad. I get this salad whenever I meet friends for lunch or whenever I’m in the neighborhood and feel like treating myself to a takeout dinner. It’s that good. Unlike most salads, it feels like a complete, filling meal purely from vegetables. The warmth of the freshly grilled veggies in the salad make it feel comforting ad satisfying without the addition of unnecessary cheese, nuts or other add ons.

For a get together with friends the other night, I decided to try to recreate the salad on my own simply by going off the ingredients for the salad that are listed on the menu: corn, zucchini, asparagus, tomato, avocado, mixed greens, and vinaigrette. Easy right? Well the real problem lied in the name of the salad itself, grilled.

I don’t know how to grill and I wasn’t about to make the night that I’m having friend over the night that I decided to experiment, so I decided to use our Cuisinart Calphalon Double Grill Pan to grill the vegetables over the comfort of the stove.  I simply oiled the pan and put it over two burners and I was able to get the beautiful grill marks and texture without the hassle of setting up the big, intimidating grill.

Once the grilling was over, the rest was easy. I just chopped the grilled veggies, added avocado, mixed them with greens and whipped together a simple vinaigrette to go with it. Easy!

The salad lived up to my delicious expectations, but the rave reviews that I got from my friends were a total surprise. Never had I seen teenagers fighting over salad so much in my life! My friends were actually going for seconds, thirds, and maybe even fourths of this salad. So Anita, Liz, and Ginelle, here’s the salad recipe especially for you.

Fresh Corn Grilled Salad

Serves 8-10

Ingredients:

  • 4 tablespoons canola oil, divided
  • 4 ears of corn, husked
  • 3 zucchini, cut lengthwise into long slices
  • 3 tomatoes, cut widthwise into 1/4 inch slices
  • 1 bundle of asparagus (about 15), bottoms removed
  • 1 bundle of scallions (about 8), bottoms and tops removed
  • 1 avocado, peeled with pit removed and cut into 1/2 inch pieces
  • 1 pound of mixed greens
  • 2 teaspoons dijon mustard
  • 2 teaspoons fresh minced garlic
  • 1 teaspoons honey (optional)
  • 1/8 teaspoon salt
  • 1/8 teaspoon pepper
  • 1/2 cup balsamic vinegar
  • 1/2 cup olive oil

Directions: 

  1. Drizzle the grill pan (or grill) with 1-2 tablespoons oil and allow it to heat up. Grill the scallions and tomatoes for 5 minutes. Grill the asparagus and zucchini for 10 minutes, turning often. Grill the corn for 10-20 minutes, turning a few times. Each time that you load a new layer of veggies onto the grill, add another tablespoon or two of new oil.
  2. Allow the veggies to cool for 5 minutes then cut the corn off the cob and cut the rest of the vegetables  into 1/2 inch pieces.
  3. In a salad bowl, gently toss to combine the veggies, avocado, and mixed greens.
  4. In a small bowl mix together the mustard, garlic, honey (if desired) salt, pepper, and vinegar. Start to drizzle in the oil into the vinegar mixture while whisking rapidly.
  5. Toss the salad with the vinaigrette and serve!

Eggy Breakfast Muffins

21 May

This weekend was my senior prom and it was pretty perfect. I was so incredibly luck to get to go with my incredible boyfriend of three years, take oodles of photos with my amazing girl friends, wear a 1980’s vintage dream dress, win prom king and queen with Goose, and top it all off with brunch and a trip to the local art show with Goose the next morning. All in all, it was the perfect night.

Now, however, the weekend is over and it’s time to return to the real world. The prospect of waking up to a blaring 6 AM alarm certainly is nowhere as exciting to going to prom with the boy of my dreams, but these little eggy cup help make week day mornings a bit less daunting.

To be perfectly honest, my real reason behind making these egg cups was just to use these adorable Martha Stewart cupcake liners that I found at Michael’s a few days ago. They have cakes and party hats and presents, what’s not to love?

These egg muffins are both adorable and delicious, making hem the perfect way to start any morning. For anyone who struggles to get enough veggies into their daily routine, these are for you! They are as fun and colorful as Lucky Charms, but packed with vitamins from the vegetables and protein from the eggs. These little egg cups are perfect to store in the refrigerator and grab one or two with a piece of toast, fruit, and or a cup of milk for a perfectly balances breakfast on the go. Or if you aren’t going to eat all of them in a week, you can freeze them and save them for later.

I ended up using kale, broccoli, red pepper, and garlic because that’s what I had on hand. I did not end up using the tomato shown because I felt that I had enough veggies already, but feel free to use whatever you want. Mushrooms, onions, zucchini, and almost any other vegetable would also taste great thrown in.

Eggy Breakfast Muffins 

Yield: 12 regular sized muffins

Ingredients:

  • 2 teaspoons olive oil or cooking spray
  • 2-4 cloves of garlic, thinly sliced or diced
  • 1 small crown of broccoli, broken into tiny pieces (feel free to cut the stem into small pieces and use it as well)
  • 1 small red bell pepper, diced
  • 5 kale leaves, torn into bite sized pieces without the firm inner stems
  • 8 egg whites plus 4 whole eggs
  • 1/4 cup milk
  • salt and pepper to taste
  • 1/3 cup cheese (optional)

Directions:

  1. Preheat the oven to 350 degrees, and line a regular sized muffin tin with 12 cupcake liners, the cuter the better!
  2. Spray or lightly oil a medium pan, then saute the garlic for about 2 minutes. Add in the broccoli and red pepper and continue to saute for another two or three minutes or until slightly softened.
  3. Next add in the kale along, 3 tablespoons of water, and salt and pepper to taste. Stir the vegetables then cover the pan for another two to three minutes for vegetables to soften and the kale to wilt.
  4. Spoon in about two tablespoons of the vegetable mixture into each muffin tin. If you have extra veggies, add them in too or save them for another use.
  5. In a medium bowl whisk together the eggs, egg whites, milk, and a bit more salt and pepper. Once combined, pour the eggs over the vegetables.
  6. Bake the eggy muffins for about 20 minutes, or until the tops appear done.
  7. To reaheat, sprinkle the egg muffin with cheese if desired and microwave it for 20-30 seconds. Enjoy!