Archive | Life Advice RSS feed for this section

Ooey Gooey Oreo Brownie Sandwiches

15 Oct

The blogosphere is abuzz with recipes for Halloween parties and Fall goodies, because these big seasonal affairs are universally exciting. But for now at least, I would rather celebrate the small things. The things that belong to no one else but me (and Goose too).

It’s so easy to get wrapped up in the massive commercial holidays, even when you hardly know their significance, or even if they have one. Celebrating the little things, like straight A report cards, loosing teeth, the first snow of the season, and monthly anniversaries can bring just as much, if not more happiness.

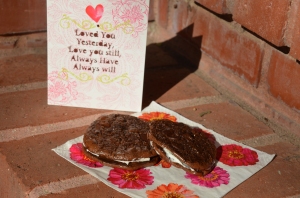
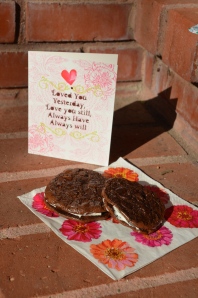
Just because the rest of the world doesn’t recognize how incredible it is to dating the same person for 39 months, doesn’t mean that it isn’t incredible.I have a habit of baking something for Goose for each of our monthiversaries, not because there is any societal custom that dictates that I should, but because I feel so incredibly lucky to shared another month with my best friend and favorite person by my side.

I challenge you, find something for you to celebrate with loved ones this month besides Halloween. Maybe you’ll end up with a new tradition, or simply a way to jazz up an otherwise ordinary day.
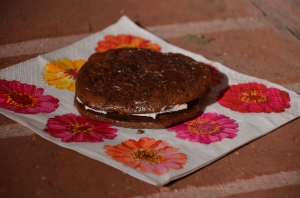
Today I’m not sharing jazzed up pumpkin pie or homemade candies, instead I am focusing on something classic and timeless, with a slightly modern update because that’s what life calls for. Something (or someone) who is dependable, but also adaptable.

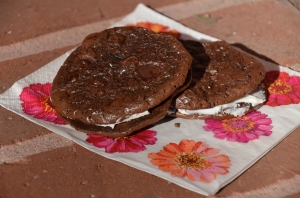
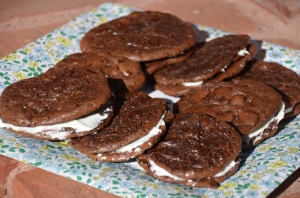
I present to you my Ooey Gooey Oreo Brownie Sandwiches. The cookies are almost like the lovechild between a brownie and a macaroon shell. They are perfectly rich and chocolately to satisfy any intense cocoa craving. I prefer to devour the cookies plain, but for anyone who prefers sweeter desserts, whip up the oreo cream filling to balance out the intense chocolate flavor.

As with your  holidays, feel free to make these cookies entirely your own. Skip the filling and instead add white chocolate chips into the cookie batter, mix some salted caramel sauce into your filling, add a smear of peanut butter along with your filling to the sandwich. Try out anything that sounds good to you! Remember that this is your life, and you deserve to do whatever makes you happy.

Ooey Gooey Oreo Sandwiches 

Cookies adapted from Recipe Girl

Yield: 10-15 cookie sandwiches

Ingredients:

Cookies

  • 3 cups powdered sugar
  • 2/3 cup unsweetened Dutch-process cocoa powder
  • 1/4 teaspoon salt
  • 1/4 teaspoon espresso powder
  • 3 large egg whites, room temperature
  • 1 tablespoon pure vanilla extract
  • 1 1/2 cups bittersweet chocolate chips
  • nonstick cooking spray (as unprocessed as possible, like canola oil spray)

Filling

  • 2 cups powdered sugar
  • 1/2 cup (1 stick) unsalted butter, softened
  • 2 teaspoon vanilla
  • 1/4 teaspoon salt

Directions:

  1. Preheat oven to 350 degrees F. Line two rimmed baking sheets with parchment paper and lightly spray it with nonstick spray.
  2.  In a large bowl, whisk together powdered sugar with cocoa powder, salt, and espresso powder. Whisk in two egg whites and vanilla extract and beat just until the batter is moistened. You’re looking for a brownie-like, thick and fudgy batter consistency. If it seems too thick, add another egg white. Gently stir in chocolate chips.
  3. Spoon batter onto the prepared baking sheets in 12 evenly spaced mounds per cookie sheet. Bake for 14 minutes, until the tops are glossy and lightly cracked.
  4. Slide the parchment paper (with the cookies) onto wire racks. Let cookies cool completely. Because of the lack of flour, these cookies are very difficult to remove. You will loose some along the way, but don’t worry, the ones that refuse to make nice with you spatula are the gooiest, most delicious ones that should be going straight into your mouth!
  5. While the cookies are cooking, make the filling by creaming the butter in the bowl of a mixmaster, about 3 minutes, then slowly add in the powdered sugar and mix until incorporated. Add the vanilla and the salt, mixing for another 30 seconds.
  6. Match up your cookies into similarly-shaped pairs. Spread the filling on one of the oreos, then smoosh the two halves together.

September Likes

27 Sep

10. Check out this wonderful list of 7 trips every woman should take in her lifetime over at The Frisky. As if anyone needed another reason to travel! While a trip may not be in your immediate plan, it’s still a good idea to keep this article in the back of your mind for the next time you’re on the hedge about leaving town.

9. I love this super-sweet heart braid featured on Cup of Jo. It is pretty enough to make any little girl jump with joy, and funky enough to dress up a basic sweater-and-jeans ensemble. No matter who wears this awesome hairstyle, it’s bound to get smiles all around.

8. Check out this incredible DIY pallet bed from Prudent Baby. I can’t believe some of the resourceful recycled DIYs that people come up with! It’s beautiful, it’s eco-friendly, and it costs practically nothing to make! Make it your own with whatever colors and prints inspire you. Besides, nothing will blow your friends’ minds like hearing that you made your own bed.

7. Check out these adorable collard-wrapped mini burritos over at The Daily Meal. They are packed with quinoa, beans, cheese, and veggies. The vibrant color and wonderful size make these a healthy and exciting appetizer for a party or special dish for a Meatless Monday family dinner. Get creative with the fillings and use whatever you like best. I guarantee it will end up costing far less than any commercial fast food burritos and it will be far more nutritious too!

6. For anyone looking to ward off a few pounds prior to donning revealing Halloween costumes or simply looking to avoid the dreaded Freshman 15, check out Slimkicker. The online database and iPhone ap turn health and fitness into a game. Upon accumulating enough points from completing your self-chosen challenges and chronicling your meals and exercise regime, you earn points to advance to the next level, at which time you treat yourself to whatever reward you chose. I love the idea of turning health into a game where you choose how hard you want to push yourself and you set your own goals.

5. All of the nail designs over at nail-fun.tumblr.com are pretty amazing, but these Cath-Kitson inspired floral nails may be my very favorite. The bright blue base and delicate rosettes are enough to make anyone smile when they look down at these nails. I doubt I could ever master the complicated designs on this site, but they certainly provide some great inspiration for the next trip to the nail salon.

4. I can’t get over how adorable this travel-inspired dessert buffet is over at Amy Atlas Events. The sweet map cut outs, vintage suitcases, fluffy meringue clouds, and pretty little hot air balloons make this such a creative update on the typical dessert bar. This seems like the perfect addition to an UP themed wedding to me!

3. I am so excited by this super-simple yoga mat cleaner DIY from Free People’s BLDG 25 Blog. It simply fills a spray bottle with 3 parts water with 1 part Witch Hazel and a few drops of essential oils with antibacterial properties such as tea tree, lemongrass, lavender, peppermint, or eucalyptus. I can’t wait to make it this weekend because my yoga mat doesn’t quite smell like roses…

2. This Ostrich Pillow on Kickstarter allows users to take a comfy power nap anywhere. I love that idea of the creators to design a product that “allow[s] you to create a little private space within a public one, to relax and unwind.” It allows you to bury your head and hands into the soft cushiony folds in order to catch some zzz’s on the go. The architecture firm who designed the product has met its goal with still 20 days to go.

1. This Decorated Cake Roll from Sugar For the Brain is absolutely awe-inspiring. Making any type of cake roll is pretty intimidating, but this beautifully printed cake seems terrifying to make. If you have the guts to try it, I can think of no better way to impress someone on their birthday. Sorry mom, I am not brave enough to make this for you next week…at least not yet. PS check out her Halloween Cake Roll on Best Friends for Frosting too!

Decoupage Memory Box

22 Aug

Many people nostalgically describe college as the best times of their life, but few people warn of the sadness that comes when it’s time to leave. Heading off to college often means saying goodbye to families, friends, homes, and cities that people have known all their lives. And while what lies ahead may be fun and exciting, saying goodbye is one of the hardest imaginable things to do.

I’m lucky because I’m moving only 30 minutes away from home, so I can come home to visit Goose and my family on weekends and even after school some days. It wasn’t just luck though. When you have people in your life as incredible as the ones that I have in mine, it’s impossible to stay away for long.

Saying “See you in November” to friends who you’ve known since kindergarten is tough. On the flip side, knowing that you won’t see them until Thanksgiving makes you appreciate what time you do have with your friends even more. Without seeing friends in school each day, you  have to decide which people are worth going out of your way to maintain relationships with via phone calls, letters, care packages, e-mails, and rare visits.

Packing up boxes of picture frames and sentimental items to take with me to my dorm left my room feeling impersonal and empty. The blank walls and eerily clean bookshelves made the room a constant reminder of my upcoming move, and from my little sisters’ perspective, of my leaving them. In an effort to show them that they will still be as much a part of my life when I go to college as they always have been, I made these memory boxes for them. This project also allowed me to test out the idea of making additional personalized boxes for friends to include in future care packages.

The boxes are really simple to make, as they involve little more than some cutting and pasting; but the personal thought and homemade aspect of the gift make this a wonderful way to show someone you care. Seize the opportunity to get as personal and creative as you want. Draw your own pictures or add text to decorate with. You can even experiment with fabric, wire, mirrors, and other materials.

Decoupage Memory Box

Materials:

  • Wooden box
  • Glue stick
  • Shiny Mod Podge  (or a mixture of 1 part Elmer’s glue to 1 part water)
  • Scissors
  • Exacto knife (optional)
  • Foam brush (or other paint brush)
  • Pictures
  • Magazine images
  • Letter or 3-D stickers

Directions:

  1. Take your time in going through old photos and magazines to choose a good selection of pictures that either hold a special memory or that you know will make the recipient smile. This is the most important step of the project. I spent months going through old magazines and a good few hours searching through my computer for the very best pictures. Gather more  images than you think you will need so that you can be selective when it comes time to actually lay out your images.
  2. Use the scissors to cut out each of your images. I chose to cut them right on the edge, but you can leave a slight border if you prefer. Just make sure that you are constant in applying the same method to all of your images.
  3. Layout what images you want on the four sides of the box, being sure to coordinate the tone and color scheme as well as possible. The longer you spend in the first step, the easier this step will be.
  4. Use the glue stick to glue down the images to each face, one face at a time. If you want your images to overlap the space where the lid and the side meet, press the top and the bottom together firmly and glue the image right on top of the seam, then use your Exacto knife to gently cut through the image along the seam. The cut will be unnoticeable in the finished produce, and you will still be able to open and close your box without a problem as long as no glue gets into the seam.
  5. Use the 2-D stickers and remaining images to decorate the top of the box, and even to dress up the sides a bit more.
  6. Coat each face of the box with a generous coat of Mod Podge, then top with any 3-D stickers if desired.
  7. Hide a special note or sentimental object inside the box and give it to someone you love.

Back to School Chocolate Strawberry & Zucchini Muffins

20 Aug

In June and even in July, summer seems like an endless stretch of time to cross items off your to do list, see people whom you don’t see often enough, and simply to relax. But as August starts to rear its ugly head, reality hits and you suddenly realize that the lofty plans you made for the summer will just have to wait some more. School and cold weather are just around the corner and no matter how tempting it may be to bury your books under your bed and forget about them, there’s no way to ignore rapidly approaching fall.

Rather than wallow in remorse over unaccomplished summer hopes and goals, focus on the exciting aspects of fall. This means that it’s almost close enough to Halloween that you can start planning your elaborate costume without sounding like a crazy person. This means it’s time to go shopping for new coats, boots, sweaters, or school supplies. This means that it’s gradually becoming time to resume your normal schedule of cozy nights indoors that your mind and body will appreciate even if you do not. And most importantly (for me at least) this means it’s starting to cool back down enough to turn back on the oven and stove to cook tasty, heart-warming meals and goodies.

Instead of resenting or resisting the passing of summer, set an example for those in your life who may not quite be ready for the change of the seasons by baking them tasty goodies to celebrate the best of summer produce in a form that is perfect for hectic fall mornings. By that I mean, bake them these Chocolate Strawberry & Zucchini Muffins, of course!


While these muffins are not exactly for picky eaters, they are delicious and nutritious, the perfect way to quell any chocolate cravings first thing in the morning while still getting in some veggies too. These muffins rely on shredded zucchini and applesauce to keep them nice and moist without the addition of any butter or oil.

Back to School Chocolate Strawberry & Zucchini Muffins

Yield: 18-20 muffins

Adapted from From the Little Yellow Kitchen

Ingredients:

  • 2 cups shredded zucchini, shredded
  • 1 cup white whole wheat flour
  • 1/2 cup quinoa flour
  • 1/3 cup sugar, rounded (or add 2/3 cup for sweeter, more traditional muffins)
  • 3/4 cup unsweetened cocoa powder
  • 1/2 teaspoon salt, divided
  • 1/2 teaspoon baking soda
  • 3/4 teaspoon baking powder
  • 1 teaspoon cinnamon
  • 2 eggs
  • 4 tablespoons greek yogurt
  • 1/2 cup unsweetened applesauce
  • 15 large strawberries (about 1 1/2 cups), chopped, plus 5 more, sliced for garnish
  • 1 cup semi-sweet chocolate chips (or you can chop up 1 bar of dark chocolate into tiny pieces-I had some left over from s’mores, so that’s what i did)

Directions:

  1. Preheat oven to 350 degrees. Line two muffins tins with silicone baking cups. Muffin batter sticks to paper liners too much, so invest in a few sets of silicone liners to avoid eating paper and cut down on waste.
  2. Coarsely grate the zucchini, then place in a colander and sprinkle it with a pinch of salt. Let it sit for about 10 minutes while combing the other ingredients to leach out the excess water from the zucchini.
  3. In a medium bowl, whisk together the flours, sugar, cocoa, salt, baking soda, baking powder and cinnamon.
  4. In another bowl, whisk the eggs. Then add the applesauce and yogurt, and stir well.
  5. Use paper towels to gently press the zucchini in the colander so that it releases any remaining excess liquid. Add the zucchini to the wet mixture and stir.
  6. Use your hands to form a well in the center of the dry mixture, then pour the wet mixture into the well. Stir until just combined. Fold in the strawberries and chocolate chips.
  7. Fill each baking cup about 3/4 full, then gently press a strawberry slice into the top of each muffin.
  8. Bake for 20-22 minutes, or until a toothpick inserted in the middle comes out clean.
  9. Allow the muffins to cool on cooling racks, then keep them refrigerated for up to 4 days or freeze them for a quick and easy breakfast or afternoon snack.


Focusing On What Really Matters With Fluffernutter Chocolate Puddles

17 Jul

Sometimes we all get so caught up in our to-do lists that we lose track of what’s really important. I’ve always struggled with separating the things that I need to do from the things that I want to do. FOr years this has been a constant source of self-inflicted angst. For instance, in high school I would always shoot for the highest A I could get instead of simply being satisfied with a 90%, I used to feel a need to check in with each of the blogs that I read on a daily basis to make sure that I didn’t miss out on anything, and I always tried to publish the greatest possible number of posts here on ModernAlice per week.

While these may be characteristic qualities of perfectionism, a few weeks ago I decided that I wasn’t going to let my goals derail me from simply making the most of every moment and living a bit more spontaneously. Some people may call it slacking off, but I simply call it reevaluating my priorities. Spending time fully focused on my friends, family, and boyfriend is my greatest priority, and I am making sure that my habits and time distribution reflect that.

What this means for my blog is that I may be blogging less frequently and with fewer step-by-step pictures of my baking projects. It also means that when I go out to dinner with my family, I will focus more on the conversation than on snapping blog-worthy photos in hopes of turning a meal into a blog post.

Now back to the cookies….

Goose and my incredible younger sisters helped me whip up these cookies and this recipe was one of my first baby steps toward more spontaneous, relaxed baking. The recipe is pretty simple and adaptable, so this is a great place to start relinquishing my kitchen control.

I baked these cookies twice last year and got rave reviews both times, so instead of spending precious time searching the internet for recipe inspiration, I wanted to share this delicious stand by with you. It combines a slightly healthier peanut butter cookie base with ooey gooey marshmallows and a decadent chocolate glaze. What’s not to love? These are a snap to whip up and a great way to show the people in your life that you care.

This ooey gooey cookie is the antitheses of light and delicate Parisian macarons. It’s a purely American mishmash of beloved flavors: salty peanut butter, sugary marshmallow, and rich chocolate. The cookies are perfect in their imperfection. What matters most about cookies are how delicious they taste, not how beautiful they look. Allow the marshmallows to deform as desires and the chocolate to spread or drizzle however it wants, and simply embrace the puddles of deliciousness.

Fluffernutter Chocolate Puddles 

Adapted from Bakegirl

Ingredients:

  • ½ cup white sugar
  • ¼ cup brown  sugar
  • 
1 egg
1 cup natural peanut butter
  • 
1 tsp vanilla bean paste (or extract)
  • 1 tsp baking soda
  • ¼ tsp salt
  • ¼ cup whole wheat flour
  • 1 bag of large marshmallows (or you can use minis if you prefer)
  • 2 cups semisweet chocolate (chips, bars, or chunks)
  • 3 tablespoons of butter
  • 1-2 tablespoons of milk (or heavy whipping cream if you want a thicker glaze)
  • cooking spray

Directions:

  1. Preheat the oven to 350. Line two baking sheets with parchment paper, then set aside.
  2. In a small bowl, mix together the baking soda, salt, and flour. Set the dry mixture aside.
  3. Combine the egg and both sugars in a medium bowl and whisk until the until the mixture becomes pale yellow. Stir in the vanilla.
  4. Spray the measuring cup with cooking spray before measuring out the peanut butter, then use a spatula to combine.
  5. Add the flour mixture from step two to the wet ingredients and mix until fully combined.
  6. Roll the cookie dough into balls, then slightly flatten them and place the disks on the parchment paper-lined cookie sheet. Bake the cookies for 5-7 minutes.
  7. In the meantime prepare the chocolate glaze by placing the butter and chocolate in the bowl of double boiler. Occasionally stir the mixture, then once it’s almost entirely lump-free, whisk in the milk. Set aside.
  8.  Remove the cookies from the oven and lightly press a large marshmallow (or 3-4 small ones) into the top of each cookie and bake for another 2-3 minutes so that the marshmallow softens.
  9. Remove the cookies from the oven and allow them to cool for 2-3 minutes. Use a fork to lightly drizzle or a spoon to drop the chocolate onto the cookies.
  10. Allow the cookies to cool on baking racks for as long as you can wait, then enjoy!