Tag Archives: farmer’s market

End of Summer Strawberry Peach Crisp

7 Sep

There is nothing that I love more than strolling through my local farmer’s market on warm summer mornings with my family and sampling the delectable varieties of peaches, plums, plots, and nectarines that the farmers display with such pride. All year I wait for the mouth-watering stone fruits to arrive, and when they finally do I take it upon myself to see how many of the juicy beauties I can eat before they disappear once more.

Now that Labor day has come and gone, summer is officially starting to come to an end. This recipe is the perfect way to savor the delicious summer berries and stone fruits before it’s too late.

Because the fruits are at their sweetest and most succulent, they do most of the work for you. Simply chop up the fruits and toss together some sugar, flour, butter, and spice and bake!

As you can probably tell by the amount of fruit this recipe calls for, it feeds a crowd. Feel free to cut the entire recipe in half for a reasonable 9 inch by 9 inch crisp, or make the whole thing and freeze the leftovers so that you can lavish in the sweetness of summer even a few months down the road.

End of Summer Strawberry Peach Crisp

Adapted from King Arthur Flour

Serves: Many (about 12-18 depending on how hungry your guests are)

Ingredients:

  • Fruit filling
    • 4 white peaches
    • 8 yellow peaches
    • 3 pounds of strawberries (about 3 pints)
    •  3/4 cup granulated sugar
    • 1/3 cup all purpose flour
    • 1/3 cup whole wheat flour
    • 1/2 teaspoon salt
    • 2 tablespoons lemon juice
    •  1 tablespoon vanilla bean paste
    •  1 teaspoon almond extract
  • Topping
    • 1  cup brown sugar
    •  1/2 cup call purpose flour
    • 1/3 cup whole wheat flour
    •  1 1/3 cup rolled oats
    •  1/2 teaspoon salt
    • 2 teaspoons cinnamon
    • 3/4 teaspoon nutmeg
    • 3/4 cup (1 ½ sticks) softened butter (or substitute coconut butter if you prefer)

Directions:

  1. Preheat oven to 350°F, then butter a 9″ x 13″ glass or cermanic baking dish.
  2. Whisk together the flours, sugar, and salt.
  3. Toss the flour mixture with the peaches, strawberries, lemon juice, vanilla, and almond extract. Then spoon the filling into the prepared pan.
  4. Use a fork to combine the brown sugar, flour, oats, and spices, then mixing in the soft butter until the mixture is crumbly.
  5. Sprinkle the topping over the fruit mixture, shaking the pan to distribute it evenly.
  6. Bake the crisp for about 50 minutes, until the topping is golden brown and the filling is bubbly. Remove from the oven, and cool briefly before serving.

***the topping makes more than needed for a 9 by 13 inch dish, so make only half a batch, or use the extra crumble on top of  oatmeal, ice cream, yogurt, muffins, or other fruit

Mini Cherry Tomato Clafoutis

9 Jul

When it comes to cooking for just myself, I’m lazy. I call this a confession, but I’m guessing that most of you can relate. Whether it’s grabbing a quick weeknight nibble in between homework and studying, or trying to shove something in my mouth before going out with friends, food ceases to be my top priority.

That’s why when I’m in a rush, eggs become my go-to meal. I simply heat up some frozen veggies in a pan with a bit of olive oil, then add the eggs and scramble them quickly, then top it off with a bit of tomato sauce and freshly ground pepper. Voila! Healthy and tasty dinner ready in under 10 minute.

The eggs are wonderful when feeding just me, but sometimes I need something a bit more presentable that I can feel good about serving to friends or family, but still don’t want to spend a long time slaving away in the kitchen. These Mini Cherry Tomato Clafoutis proved to be the perfect solution. They take less than 10 minutes of active prep (plus 32 minutes in the oven) and come out looking pretty impressive if I do say so myself.

Fresh out of the oven, they are light and airy souffle-like creations that make you look like a master chef, no one else needs to know how easy they are to make. Within a few minutes, however they fall and become a bit denser, taking on an almost pancake-like consistency.

These are a perfect appetizer and they taste just as good microwaved for breakfast the next morning. The tartness of the tomatoes adds a delicious contrast to the comforting eggy taste of the Clafoutis itself. Make them in the next few months to take full advantage of summer’s most flavorful tomatoes.

Mini Cherry Tomato Clafoutis

Adapted from Vegetarian Times Farmers’ Market Cookbook

Serves: 12

Ingredients: 

  • 3 large eggs
  • ⅓ cup flour
  • 1 ½ cups skim milk
  • 3 tablespoons nonfat greek yogurt
  • 2 tablespoons fresh thyme leaves
  • ½ teaspoon salt
  • ¼ teaspoon ground black pepper
  • 1 pint grape or cherry tomatoes, halved (2 cups)
  • 3 tablespoons finely grated Parmesan cheese
  1. Preheat oven to 375°F and coat a 12-cup muffin pan with cooking spray.
  2. Whisk the eggs in bowl, then gradually whisk in flour. It may be slightly lumpy, but try to get it as smooth as possible.
  3. Stir in milk, yogurt, thyme, salt, and pepper.
  4. Divide the batter in two, then distribute 1/2 of the batter among the 12 muffin cups. Bake 10 minutes.
  5. Place 3-4 tomato halves in each muffin cup, round-side up. Pour remaining batter over the top and sprinkle with cheese. Bake 22 minutes more, or until tip of knife inserted in center comes out clean. Cool 1 minute, then unmold with knife or thin spatula. Serve warm.

Homemade Italian Style Vegetable Soup

9 May

The sudden arrival of Spring means two things. One, the weather gets warmer so that frolicking outdoors starts to seem more appealing than slaving away in the kitchen.  Two, the farmer’s markets are full of the freshest, cheapest delicious produce. To take full advantage of the best of both situation, I highly suggest that you make this soup!

Now I know that making soup just as it’s finally starting to get warmer out may seem counterintuitive, but I promise, this really is a good idea… This soup is chock full of delicious vegetables to provide you with energy without weighing you down. By making this soup now, you can have it stored away in your freezer for easy, nutritious meals all summer long. My logic is, stock up now so that you don’t have to think about it later!

Homemade broth

This soup makes a veggie-filled accompaniment to any lunch or dinner. Store it in individually-portioned glass jars in your freezer, so that you can take it out the night before and have a delicious, preservative-free soup ready when you want in.

Mishmash of delicious veggies

This is an incredibly flexible soup to which you can add any vegetables, herbs, or spices that you have on hand. Feel free to add beans and pasta to make it more of a traditional Minestrone. Or top the soup with a bit of pesto to give it a French provincial flavor. You can even substitute the basil, oregano, and thyme for some miso paste and siracha sauce to give it a slightly Asian taste.

Delicious and nutritious and ready to go!

Homemade Italian Style Vegetable Soup

Servings: 8

Time: 2 hours

Ingredients

  • 4 cups of assorted vegetables in less than pristine condition (onions, carrots, celery, bell peppers, mushrooms, lettuce, leeks, ect)
  •  2 bay leaves
  • 12 peppercorns
  • 3 cloves of garlic, lightly chopped
  • 1-2 sprigs of rosemarry or other herbs
  • 1 tablespoon olive oil
  • 1 celery stalk, chopped
  • 1 large yellow onion, chopped
  • 1-2 leeks, chopped
  • 4 cloves of garlic, minced or chopped
  • 2 carrots, peeled and chopped
  • 1 medium zucchini, chopped
  • 1 (28-ounce) can of diced tomatoes
  • 1 1/2 cups of frozen green beans
  • 1/2 teaspoon dried basil
  • 1/2 teaspooon dried oregano
  • 1 teaspoon dried thyme
  • 1/2 teaspoon salt
  • 1 teaspoon ground black pepper
  • 2 cups coarsely chopped fresh or frozen spinach or kale, defrosted

Directions

  1. Dump your assorted vegetables, bay leaves, peppercorns, garlic, and herbs into a large stock pot and fill the pot with enough water to just barely cover the vegetables. With the stove on high, bring the water to a boil, then reduce the heat to a simmer for 30 minutes to an hour. In the mean time chop up and prepare all of your vegetables for the soup itself. Use a strainer to remove the vegetables, and then set the remaining vegetable broth aside. Alternatively, if you don’t have the time, you could skip this step altogether and use boxed or frozen vegetable broth.
  2. Using the same stock pot as before, lightly saute your celery, onion, leeks, and garlic in olive oil until soft. Add your carrots and zucchini and continue to lightly saute for another 1-2 minutes.
  3. Pour in the tomatoes, green beans, basil, oregano, thyme, salt, pepper, and broth (from step one).
  4. Allow soup to simmer for 30-45 minutes, then add in the spinach or kale, and allow it to cool for an additional 10 minutes.
  5. Ladle into bowls and serve (or freeze). Enjoy!

Versatile and Delicious Vegetable Broth…My Ode to Soup

8 Jan

Do you have a soup that you could eat everyday, multiple times a day, and never get bored of it? For me that food is soup.

Growing up I only liked super creamy soups lie New England Clam Chowder, but ever since I had my wisdom teeth removed two summers ago, I’ve been a soup addict. I adore almost any soup, especially spicy vegetable soup, flavorful vegetable purees, or Asian soups with seafood and vegetables. In terms of canned soups, Amy’s ChunkyVegetable Soup is yummy, but the Bisphenol A and high sodium content, makes me stay away from it whenever possible.

To fulfill my hankering for soup without wasting tons of money and packaging, I’m going to make my own soups.  I plan on making a variety of healthy, cheap, and tasty soups over the next few months. The secret to making really good soup is to start with flavorful broth, so I’m going back to the basics…broth.

For the past few weeks I’ve been saving carrot stubs, leftover portions of onions, unsused parsnips, wilting herbs, and whatever other vegetable scraps were in line for the trash bin. I put the marginal produce in a giant (reused) plastic bag in my freezer for when I finally get around to making vegetable broth. By doing this I’ve saved time and money, so I highly recommend that you freeze food scraps for the future.

I mainly used frozen scraps and other vegetables that I had lying around my house, but I also bought some discounted produce at the Culver City Farmer’s market the other day. You could also find cheap produce that’s past it’s prime in the back shelves of your local grocery store. Feel free to use whatever vegetables are in season or whatever you have lying around your house.

After making my broth I frozen it in 1/8 cup ice cube trays, 1/2 cup tupawares, and 1 quart containers so that I can add however much broth I want to make soups, stuffings, and other recipes in the future. I then transferred the broth ice cubes and small tupawares into a large plastic bag in the freezer to conserve space.

Below is basic recipie that I used, but feel free to adapt it based on what ingredients you have on hand.

Ingredients:

  • 1 parsnip
  • 2 red peppers
  • 1 green pepper
  • 2 cups of button mushrooms
  • 4 cloves of garlic
  • 4 carrots
  • 1 red onion
  • 1 1/2 yellow onions
  • 3 tomatoes
  • 2 tbs olive oil
  • salt and pepper to taste
  • 5 stalks of celery
  • 10 peppercorns
  • 4 cloves
  • 2 sprigs of rosemary
  • 1/4 cup of basil leaves
  • 2 bay leaves
  • 8 cups of water

Directions:

1.Preheat over to 450 degrees

2. Thoroughly wash all produce, then slice mushrooms in half, cut peppers into quarters and remove seeds, break carrots and celery stalks into thirds, and cut onions in half

3. Place all vegetables except for celery (parsnip, peppers, mushrooms, garlic, carrots, onions, and tomatoes)  on a cookie sheet and drizzle lightly with olive oil, then season with salt and pepper

4. Roast the vegetables for about an hour or until they start to brown, stirring them every 20 minutes

5. Fill a large pot with roasted vegetables, celery, peppercorns, cloves, rosemary, basil, bay leaves, and water

6. Bring water to a boil, then reduce it to a simmer and allow it to sit uncovered for at least two hours (the longer the better)

7. Once the broth is fragrant and has a rich brown color, pour it into a colander to strain it, then ladle the broth into your desired containeers and freeze

Enjoy wonderful readers! What are you going to make with your delicious vegetable broth?

Bohemian Rhapsody in Culver City

4 Jan

As I mentioned in my post yesterday, I had lunch with my mom and two of my sisters, checked out an eccentric art exhibition, shopped in a few quirky boutiques, and loaded up on produce at the farmer’s market… and I did all this within a ten-block section of Culver City.

First we had lunch at Royal T, a zany cafe/store/gallery where elegant furnishings contrasted with the utilitarian space.

I ordered a delicious Tuna Tataki salad and a pot of yuzu green tea.

After lunch we walked around the art space where the current display showed a mishmash of recycled objects used in unconventional ways.

Before leaving Royal T, we looked around the store that is continually restocked by various curators. The various unnecessary, but wonderful nicknacks made me chuckle.

As we walked through Culver City, we passed a variety of beautiful, historic buildings including the Culver Hotel, the Citizen Publishing and Printing Company, and Ashaka Restaurant.

Next we shopped around a great gift boutique called Lundeen’s where they had a great assortment of cards, toys, and house wares.

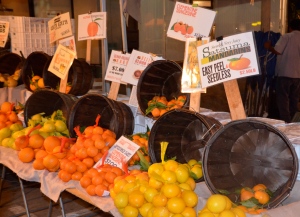
Last, but certainly not least, we shopped around Culver City’s weekly farmer’s market that happens every Tuesday from 3-7. There were about two dozen vendors selling everything from crafts to prepared food to organic produce. I bought a hand carved “Namaste” sign, korean kimchee, winter citrus, and a variety of vegetables to make homemade vegetable broth later this week. 

I had a wonderful adventure in Culver City yesterday afternoon and I highly recommend that any of my readers who live near LA make sure to check out the many shops, restaurants, and markets that the city has to offer!